Rivet

The rivet is a metal fastener used to attach a substance such as timber, sheet metal, leather or plastic into some other substance. It’s an industrial look and the capacity to connect materials having a shear-force strength. Other metallic fasteners include screws, keys, pins, rings, nuts and clips.

Heather Merenda

For blending materials such as wood and steel, adhesive or screws can perform the job, but using rivets the old-school way is gaining popularity. The heated metal gets soft and is squashed to shape the head, and the layers it combines are tightly squeezed together when the metal cools and shrinks.

STRATAap Architecture

This garage door resembles the riveted boards of an airplane or a massive tanker, in which the layers of metal wouldn’t be pulled apart (pressure force) but need to withstand water or wind movement (shear force).

Jamie Laubhan-Oliver

Rivets can be secured with warmth and a hammer, or using a rivet gun, which smashes the trap without heat. Both methods create a button that is bigger than the hole it passes through, making a lasting connection.

Georgetown Development

Welding gained fame over riveting from the 1920s and’30s. Riveting demanded several workers to take on the functions of heating, tossing, catching, putting and hammering the rivets into place. Welding was a quieter process and demanded less teamwork.

GM Construction, Inc..

The placement of rivets is quantified and spaced evenly, allowing for curved and bowed surfaces such as airplanes, boats and this custom-made kitchen hood.

Beinfield Architecture PC

Rivets can have a pan head, a snap head or a mushroom head, or be countersunk, which means that the top of the rivet is flush with the surface it links. These rivets extrude, or extend outside the sheet metal.

See related

Contractor Tips: What Your Contractor Truly Means

Contractors did not become contractors because they like to convey. If they did they’d have become speechwriters or newscasters (or get a gig writing ideabooks for ). Sometimes what they say seems completely evident for them, but makes no sense for you. And a builder might talk euphemistically to dance about difficult topics. This advice should help you translate some of the euphemisms and somewhat curt statements you might hear, so that you get the maximum out of the client-contractor relationship.

1. Nothing. If he doesn’t call you back, he’s just not that into you. You do not need to chase a builder who is too busy to return your telephone, unless you have given him cash.

2. Let us do it my way rather. Odds are, your builder has more experience doing things a certain way, therefore he may want to urge that procedure. It’s usually best to go with it rather than having him try something for the first time on your job.

Buckminster Green LLC

3. I’ll begin late next week. If your overall contractor sets a beginning date, then he ought to have the ability to retain it. But a lot of times the tradesmen (electricians, technicians, etc.) juggle many jobs simultaneously and often have to take care of emergencies. You need to expect them only to come close to their beginning and completion estimates.

4. The cost will be…
Unless you’re changing the range of work, a builder won’t expect to negotiate a lump sum cost estimate. If you think the cost is too high, get the following quote for comparison. While prices vary because of differences in approaching the undertaking or overhead expenses, a builder won’t stay in business unless he prices competitively.

Uptic Studios

5. I’ll do my best. There is a good chance a contract will fall short of your expectations. If you hear this, then hear your gut. Have you been asking for a great deal? Perhaps you have added work to the extent, but asked for the job to be finished by precisely the exact same date? Are you anticipating a brand new look from a remodel with existing elements?

There are 3 elements to any project: The level of quality, the cost and the time it requires to complete the undertaking. Pick two of these that are most important to you. Should you need everything ideal by a certain date, be prepared to pay more. If you’ve got a fixed budget but need a certain look, give the contractor time to be inventive and make it work.

Anthony James Construction

6. But I can not make a recommendation. Most builders prefer that you just work. Should you request your general contractor for their plumber’s name and number and he provides it to youpersonally, thank them. By enabling you to work directly with a subcontractor your contractor requires a risk by giving up control of the situation. In addition, he gives up the power to indicate the cost of the work that the plumber does, and this is just one of the ways builders get paid.

Buckminster Green LLC

7. The layout had some tweaking. Frequently, this means that the plans were unbuildable. Sometimes what is drawn on paper just can not be constructed. A stairs you would need to crawl on your knees to utilize, “existing” spaces that don’t exist, a pocket door that would slide through a switch box along with the shower enclosure — I have seen all of them.

8. I don’t think this is a good fit. If a builder declines to estimate a job it could be for a whole lot of factors. Perhaps he has concerns regarding the budget. You and your contractor will be speaking a whole lot, so perhaps he just did not think you clicked. It could also be that he’s too busy, and that he won’t have the ability to devote enough time for your job to do it right.

Buckminster Green LLC

9. We will have to do some value engineering. You have got caviar dreams on a cheese and cracker budget. Value engineering is as soon as the team thinks creatively about how to rework the job to do the exact same or similar extent for less, like by changing material selections.

10. Let us walk through and make a hit list. A contractor wishes to know everything you need done to be satisfied with the work. Every visit to your project prices your contractor, therefore make an effort to think of a comprehensive punch list –a list of to-do things which have to be done for your job to be considered complete — instead of sending it bit by bit as time passes.

Next: 10 Home Projects That Probably Need a Guru

See related

Fantastic Design Plant: Kousa Dogwood

Cornus kousa (kousa dogwood) is a beautiful ornamental shrub that is not quite as common because its popular comparative, Cornus florida (flowering dogwood). If you’re looking for a spring bloomer for your lawn, a kousa dogwood will provide you amazing bracts for four to six weeks, some downright Dr. Seussian berries in summer time, some vibrant fall color and, as it ages, gorgeous exfoliating mottled bark to admire during the winter. Continue reading if you want to get to know the kousa dogwood better.

The New York Botanical Garden

Botanical name: Cornus kousa
Common titles: Kousa dogwood; Korean, Chinese or Japanese dogwood
USDA zones: 5 to 8 (find your zone)
Water condition: Consistent moisture
Light requirement: Full sun to partial shade
Mature size: 20 to 30 feet tall with an equal spread since it matures
Benefits and tolerances: The biggest tolerance of notice is that the kousa interrupts anthracnose disease, which plagues flowering dogwood. It prefers moist, and well-drained soils but may withstand dry and compact soils.
Seasonal interest: Lovely bracts in the spring, fruits in summer, reddish-purple foliage in fall
When to plant: Following the last frost in the spring

Liquidscapes

Distinguishing traits. Kousa dogwood is famous for being more upright than its comparative, flowering dogwood (C. florida). But as it ages, it will spread out from a vase shape into a round form. Those blooms you know and love are now bracts underneath smaller yellow-green flowers.

The New York Botanical Garden

These bracts show up at the spring and last for about six weeks since the tree leafs out, eventually turning pink with age till they drop off.

From the late summer or early fall, kousa sprouts pink edible fruits. They’re bumpy-looking berries around 1/2 inch in diameter. Once mature, they aren’t too bad. (Could you tell they’re not my personal favorite?)

As they ripen, they make more pink, turning into a dark cherry shade. These berries are the easiest way to differentiate kousa from other dogwood species.

From the fall, kousa dogwood’s leaves turn a brilliant reddish-purple. In the winter, the absence of leaves reveals lovely bark that exfoliates with age, which is just another distinctive trait.

Liquidscapes

How to utilize it. Kousa dogwood is a wonderful ornamental tree to your lawn. Use it as a specimen tree or in a grove. Because it is tolerant of shade, you might also use it at the edge of a woodland.

If you would like to maintain your dogwood’s flowering season going as long as possible, utilize it with flowering dogwoods, as kousas will bloom about a month later than flowering dogwoods.

Liquidscapes

Planting notes. Make sure that your soil is loose, fertile and well drained. Till a nice area that is at least three times the size of your root chunk.
Dig a hole twice as wide and as deep as the root ball. Loosen up its roots and place it in the pit. Fill the remainder of the hole back with soil and tamp it down. When the remainder of the pit is half filled with dirt, add water and let it drain before filling it the remainder of the way.Water it thoroughly and add a couple inches of mulch; nonetheless, don’t let the mulch touch the trunk of this tree.
More: Read more great layout plants

See related

Embrace a Hot Trend With a Kitchen Warming Drawer

Warming drawers have been sweeping kitchens across the USA! These independent appliances permit you to keep prepared meals warm, to heat dishes and to slow to evidence bread dough. Often installed with a fitting wall mount, a warming drawer can be coordinated with other kitchen appliances to obtain the look and feel of a streamlined, high-functioning kitchen.

Since the countdown to my cookery renovation continues, it seems as if I’ll be adding yet another appliance to my wish list. I love a piping-hot plate of food, so it sounds a built in streamlined warming drawer is the perfect answer for us.

What about you? Take a look at these examples and let me know what you think.

Steven Miller Design Studio, Inc..

Viking’s warming drawer beautifully matches the side-by-side fridge and microwave in this San Francisco kitchen.

Dzignit, Patrice Greene

As opposed to consume wall cabinet space, this warming basket tucks easily into normally unused space on the kitchen peninsula.

Aquidneck Properties

Warming drawers are separate appliances and are often installed to coincide with the wall mount, as exhibited in this country-style kitchen.

The Furniture Guild

It is possible to disguise your warming drawer with a custom cabinet panel.

Farinelli Construction, Inc..

The brief end of a kitchen island typically goes unused. A warming drawer is a intelligent use of the distance.

Greenbrook Homes

Put a warming drawer next to the oven, so when a dish is finished baking you can immediately tuck it away for warming.

Fran Kerzner- DESIGN SYNTHESIS

Kitchen warming drawers are intended to supply a low warmth that’s excellent for keeping meals dishes and hot warm. They can even evidence bread dough.

Glenvale Kitchens

To save space, you can stack wall mount with a warming drawer in a cooking tower cabinet module.

See related

Cool-Season Vegetables: How To Grow Broccoli

Broccoli is a vegetable staple, and for good reason. It may be eaten cooked or raw, and either way it has lots of nourishment. It has also become a garden staple. Not only is it effortless to grow, but there is a surprising amount of variety in colour, with dark green to chartreuse to purple florets or heads.

Besides the standard broccoli heads, you may also develop broccoli rabe, also called raab or rapini, and sprouting broccoli. Rabe has miniature florets with a perky taste. Sprouting broccoli produces tons of florets along a stem as opposed to a single mind, and may be frequently seen in the gardens. All need the care.

More: The way to grow cool-season vegetables

When to plant: Start seeds indoors about six weeks before the last frost date in spring; you will want to ensure that the crop reaches maturity before hot weather sets in, as it will quickly bolt. Place plants about two weeks before the last frost date. In climates with mild winters, you can sow seeds in summer or in early fall to harvest later in the fall or in winter.

Days to maturity: 50 to 100

moderate requirement: Total sun; semi shade where sexy

Water necessity: Regular watering

Favorites: Apollo, Belstar, Calabrese, Di Cicco, Flash, GreenComet, Green Goliath, Packman, Premium Crop, Purple Sprouting, Romanesco, Sorrento, Spring Raab

Planting and maintenance: Broccoli prefers very rich soil, so amend your bed before planting. Sow seeds fairly close to the surface, roughly 1/4 to 1/2 inch deep and an inch apart, then thin to 1 1/2 to 2 feet apart, or much more if the varieties are extremely large. Set transplants out at precisely the same spacing. Keep the plants evenly dispersed and mulch to keep the soil cool. Employ a high-nitrogen whole fertilizer just before heads form. Keep weeds down but be cautious when weeding to not harm the roots.

Unfortunately, broccoli brings a range of insects and diseases, including but not limited to aphids, cabbage worms, harlequin bugs, damping off, downy mildew and fusarium wilt. See your plants carefully and choose appropriate, but not extreme, measures if problems begin to emerge. Don’t go overboard; take some opportunity to see if the problem can correct itself obviously. If it continues, though, move on to stronger measures before you lose your harvest.

Harvest: Cut approximately 6 inches under the head right before it opens and flowers. The side branches will also form heads; harvest them the same way. Harvest the leaves and shoots of both raab and sprouting broccoli before they flower as well.

See related

Design Solutions for 11 Tricky Spaces

From long and narrow “railroad” flats to teensy rooms and studios that appear to be all doors and windows, every home has its own design challenges. If you’ve hit a roadblock (where in the world can I put that sofa?) Or merely believe there should be a better method of organizing your space, read on — we’re covering alternatives for 11 of the most typical space-planning dilemmas.

A+B KASHA Designs

Getting started. As with the start of any design project, it helps to look at your space with fresh eyes. Go out, grab a cup of coffee and come back for another look when you feel refreshed. Even better, bring a design-savvy friend together and ask what he or she’d do with the distance. Sometimes just hearing others’ thoughts can help get your own creative juices flowing and lead to your best thoughts.

When the room is really giving you trouble, I recommend taking every scrap out of furniture and looking at it entirely bare. When layers of stuff are clogging up your perspective, it can be tough to imagine setting up the room in any other way.

Move the stuff, and you may have the ability to move the psychological roadblocks too.

Hufft Projects

Tricky distance 1: Long, narrow hall

The solution: Think art gallery. Fresh white walls are the classic choice, though textured grasscloth or a coat of rich colour would work equally well. Go sleek and easy with black and white pieces, or make a quirky gallery with diverse, colorful artwork hung in a line, using a few frames left intentionally empty. Complete the space with appropriate lighting. Try overhead track lighting or small wall-mounted lights to light up the art.

Moment design + productions, llc

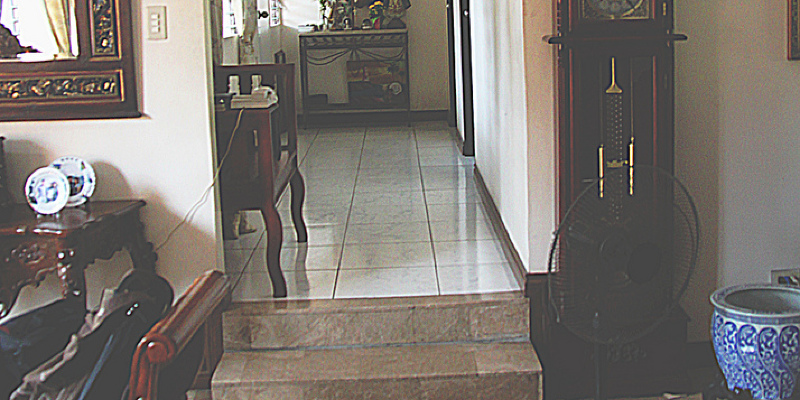
Tricky space 2: Small home, long hall

The solution: instead of let precious space go unused, put your hallway to operate by installing floating cabinets and shelves. Floating the storage pieces off the ground retains the area from feeling too cluttered or heavy. Just make sure you measure carefully, choosing cabinets that are narrow enough to permit ample room to walk by. Create a point of keeping the floors clean and surfaces carefully curated — jumble will get noticeable quickly in a tight space such as this.

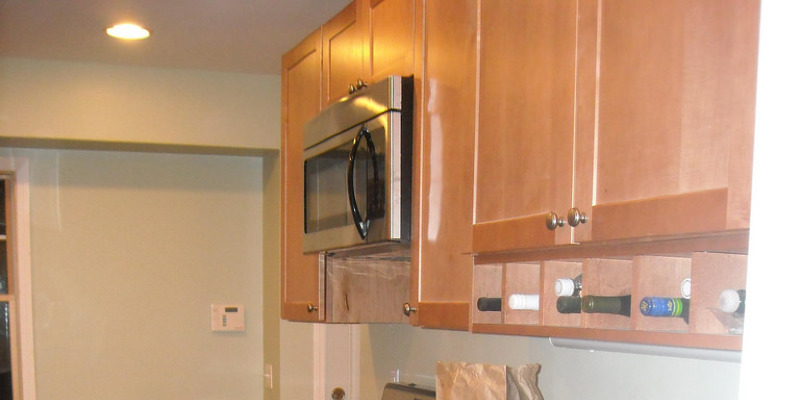
Tricky distance 3: Small distance, no entryway

The answer: Don’t bother trying to squeeze a teensy table behind the door. It will just bug you, and it will not be large enough to hold considerably. Instead, look for the first open open wall and set a larger desk or storage bit there, letting it do double duty as an entertainment centre or workspace.

When there’s literally nowhere to put a table, consider using a few small, sleek wall-mounted pieces instead. A few hooks for keys, coats and bags along with a floating shelf or sorter for email are all you really need to handle the essentials.

Fivecat Studio | Architecture

Tricky distance 4: Eat-in kitchen using too many doors and openings

The solution: In places where a square or rectangular table would stick out like a sore thumb, go around instead. Curved contours generally fit into awkward areas, softening the hard edges in a room. Try to pull your table near a wall socket, even if it’s just as small part of wall at the room revealed here; it looks more natural than setting the table dead-center.

Tim Cuppett Architects

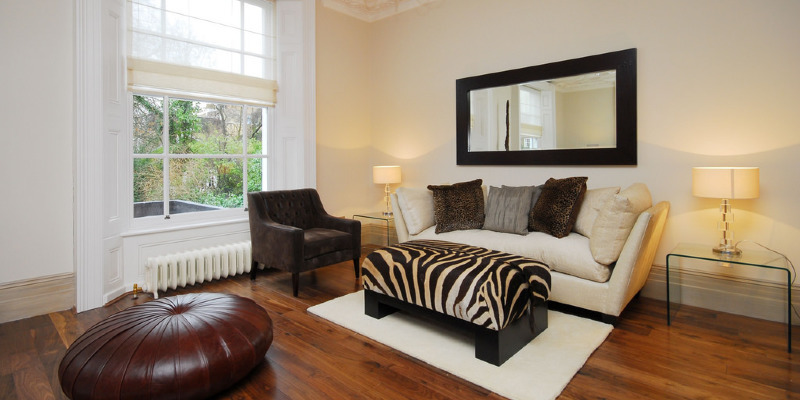
Tricky distance 5: living room with multiple doors and windows

The solution: If your living room has a component (door, window, fireplace, radiator) that prevents you from placing furniture near the walls, consider pulling the arrangement toward the middle of the room instead. Use the symmetry of a matching pair of couches to counteract the chaos of these entries and exits, and include a comfy area rug to anchor the conversation area.

Get guidelines on using area rugs

Studio D – Danielle Wallinger

Tricky distance 6: living room with hardly any available wall space

The solution: If your living room is driving you nuts, then have a look at your dining room instead. Can you create a swap? Multiple windows and doors do not really matter at a dining room, as furniture needs are minimal (table, chairs, perhaps a sideboard). And what’s more romantic than dinners by the fire?

Nichole Loiacono Design

Tricky distance 7: Tiny studio apartment

The answer: Small-scale furniture and careful preparation are crucial in a tiny space that has to serve several purposes. Round tables and furniture using curvy contours create browsing tight quarters easier, whilst glass or Lucite tables create more visual distance.

Ample storage is likely to make your life much easier, so look for smart designs that sneak in extra room. You can use storage ottomans rather than a coffee table or a classic dresser rather than an entertainment centre, or even conceal an entire wall of shelving behind attractive curtains on ceiling-mounted sticks.

Tricky distance 8: Slanted ceiling the under stairs

The solution: if you’re able to afford to make the investment, custom built-in closets, shelving or desk space is a wonderful way to make use of every last square inch. Otherwise, low-profile furniture like a small daybed (with no headboard or footboard) or chaise may turn into an awkward nook into a cozy hideaway.

For People design

Tricky space 9: Small living room

The answer: It’s a bit counterintuitive, but also many itty-bitty pieces may make a room feel cluttered and cramped. Strike a balance by choosing pieces that appear large but have sleek lines (no wrapped arms!) . Substituting an upholstered ottoman to the normal coffee table is an easy way to sneak in extra seating, and a pair of petite armchairs can fit in the space of a single overstuffed edition. Finally, make sure to place lighting all of the way into the back corners of a room — nothing shrinks a room faster than lighting.

Tricky space 10: Long, narrow room

The solution: When it comes to decorating a long, narrow space, you will want to construct in a few breaks in the sight point, which visually divide the distance and supply areas for different uses. Rather than push the sofa against the wall, then consider having a smaller-scale loveseat placed perpendicular to the wall as one of your room breaks. You are also able to use a very low cupboard or table behind the sofa to specify the line between two main zones; simply make confident that the cabinet is level with, or a few inches shorter than, your sofa.

Ziger/Snead Architects

Tricky space 11: High ceilings, large open space

The solution: Accent pieces with height (such as the arc lamp featured here) will visually fill the vertical distance. Supersize rooms can handle larger-scale furniture, so don’t be afraid to go large. A huge dining table made from a natural timber slab with an eye-catching pendant light hung over it might make a stunning focal point for your room. Create a comfy seating area in a different spot using two facing couches pulled perpendicular to a wall, and complete the arrangement using a big rug (or two rugs layered together) to include softness.

What is the most difficult space you’ve ever lived, and how did you deal? Leave a comment and fill us in!

Browse solutions to common design problems

See related

Playful Riverfront Pad in Oregon

Given its modern exterior, expansive backyard and beautiful riverfront location, it’s hard to think this home was once an outdated duplex. Homeowners Rich and Alicia dwelt in half of it for decades before taking the plunge on a full scale remodel. A second-story master suite, cedar exterior additions and new decks and landscaping generated plenty of indoor and outdoor area for this family.

in a Glance
Who lives here: Rich and Alicia; girls Hatte and Hazel; gold retriever Spinner
Location: Milwaukie, Oregon, near Portland
Size: 2,800 square feet; four bedrooms; four baths
That’s interesting: The backyard features a 75-foot zip line.

John Prindle

Rich and Alicia wake up to this particular view of the lush backyard out of their master bedroom. The calm Willamette River is located in the backdrop.

They moved here with a little bit of trepidation: The region suffered extensive damage from a notorious Portland flooding in 1996. Thanks to a lot, their home fared well.

John Prindle

The house was an outdated duplex once the couple moved in. Working with Gary Hartill of OrangeWall Studios, they saw the possibility, gutted it and rebuilt the construction. The renovation integrated a second-story master suite and contained fresh decks and landscaping. The group maintained the original shingle siding on the duplex and accented the new improvements with flat tongue and groove cedar.

John Prindle

Rich, a former contractor, built the treehouselike patio deck around an present tree. It could be reached by the garden line — a favorite activity of this couple’s daughters as well as their friends.

John Prindle

The main floor of the home is a totally open area. The corner dining area holds a handmade plywood table that’s immune to the indiscretions of 2 artistic daughters.

Following dinnertime, a sport of foosball or an impromptu dance session under the mirrored disco ball leaves the home full of fun and energy that is positive.

John Prindle

Artist Tyler Schlicting painted this hummingbird scene in 2006, and it’s a family favorite. The painting hangs in the corner of the dining space, mixed into a gallery wall of art by Hatte and Hazel. Paper animals from the Museum of Contemporary Craft make up the weeks of a calendar.

John Prindle

The spacious kitchen lets plenty of space for inquisitive chefs and provides a great view of the river. The teak-veneer cabinets are lucky leftovers out of an architect friend’s job. The raised kitchen bar is made of reclaimed wood from a Phillippines schoolhouse.

Pendant lights: Otto x Otto, Lighting Universe; rug: Ikea

John Prindle

Just off the dining area is located a seating area which Alicia has called “The Bird’s Nest.” A magnificent view of nearby Elk Rock Island and also an occasional appearance in the bald eagle make this a popular perch.

John Prindle

The spaciousness of the principal flooring is best appreciated when you look toward the door. The oversize rug in this area has been in Alicia’s family for about 120 decades. An abstract photograph by Kirk Jonasson hangs over the living room fireplace.

John Prindle

Among the biggest challenges of the remodel was the complete redesign of this stairs. The stairs used to go the other way and were super steep. “I had to leave if they were bringing in the metallic beam that retains the stairs,” Alicia says. “It had been the one thing that really stressed me out. I am not even sure how they got it.”

John Prindle

The stair treads are created from reclaimed mahogany, sourced from a demolished 1930s schoolhouse in the Philippines — the exact same wood used on the kitchen bar counter tops.

John Prindle

New skylights brighten the distance, and UFO-like lights out of Foscarini O-Space hang over the stairs. The modern pendants add a classy touch using an orange accent wall serving as the background.

John Prindle

Future film manager Hatte’s area has the exact same upbeat vibe as the rest of the home. Rich built the cabinets and loft bed over a two-week time while the rest of the family was back east to find relatives. Visiting artist Allison Reimus, who once lived with the family, did the portrait of Hatte.

John Prindle

Upstairs, the master bedroom’s balcony seats makes it possible for the few to enjoy views of the river. At the corner is another comfy birdwatching nook.

John Prindle

Flowers grow across the front and back of the home. An enthusiastic gardener, Alicia cut these pink roses for a nice impromptu tablescape.

Can you have a creative, lively home? Discuss it with us!

See related

10 New Appears for Fireplaces in Older Homes

Living in the Midwest, we utilize our fireplace a good deal in the winter. A glowing hearth can add such warmth to a room, both literally and figuratively. This really is a bonus in an old home with quite old windows that allow out quite a bit of valuable warmth in the winter.

In most older homes like my very own, the living area is centered around the fireplace, mechanically placing your mantel as the focal point within the room. Finishing and accessorizing your fireplace and mantel can completely alter the atmosphere in a room you probably spend most of your time — if it is fireplace season or maybe not.

Julie Williams Design

At times it seems there isn’t anyplace else for the TV to go except above the mantel. I’m sure the first owners of our old homes could never imagine such a thing, but now it is common and can be carried out in a way that doesn’t detract from the room’s decor. The dark paint on the woodwork can help to disguise the TV better than if it had been painted white like the shelves.

See more on where to put the TV

Kayron Brewer, CKD, CBD / Studio K B

This Craftsman-style fireplace is extremely popular in 1920s and 1930s bungalows. This chamber has a contemporary approach that starts with the tile surrounding the fireplace. The rest of the room pulls in the deep browns and caramel colors found in the tile.

Judith Balis Interiors

This is a very different way to dress up a Craftsman-style fireplace. Talk about glam! The bold colors and the striped couch are meant to be paired with that mirror. Also, notice how the fireplace just seems to blend into the decoration. Since black is utilized throughout the plan, the fireplace doesn’t look overly heavy but still seems to anchor the space.

Emily Ruddo

This fireplace mantel blends into the background. The colour closely matches the wall color, while bright accessories top the mantel and bold fabrics draw your attention away in the fireplace. This may be a fantastic way to use when your fireplace isn’t functional but still acts as a fixture in the room.

Kathleen Ramsey

I like the grey tones used in this tile. The mantel was painted in one of those darker hues, which makes it a little more dramatic than if it was painted lighter. The accessories and artwork are kept simple and neutral.

Mark English Architects, AIA

Brick fireplaces are common in older homes. If brick isn’t your style, just paint it. This painted white brick lightens a space already saturated in colour and gives your eyes a break. Without making the mantel busy straightforward accessories provide height.

Rebekah Zaveloff | KitchenLab

The owners have left this beautiful timber mantel in its first state. So many older mantels are painted, so we never see their first glory. Even though the mantel appears very conventional, a patterned tile is utilized that’s echoed in the varied bold prints of the carpet and the ottoman. This chamber proves you can have a conventional finish but combine it with bold, fresh patterns.

MuseInteriors

Modern art with this fireplace pairs well with the more traditional decoration to maintain the room feeling upgraded.

Kevin Kelly Interiors

This mantel is dressed with an oversized mirror with a scale that matches the height of the ceiling. This helps draw up the eyes to that gorgeous crown molding that’s frequently found in older homes. And did you observe the whimsical larger-than-life lamp in the corner?

Julia Ryan

This is a notion that we’re considering doing in our formal living room. You can extend your fireplace by adding ornaments to the ceiling and painting it the same colour. This creates a great backdrop for art and would suit board and batten or trimming already on your own space. The bottom ledge offers a wonderful place for decoration. Many men and women use a candelabra in a fireplace when it is not being used, but the plate and also books have a more eclectic and contemporary feel.

See related

Contractor Tips: Finish Your Basement the Ideal Way

Basements are catchy. These big distances beg for a new use, but they often become dumping grounds for many of life’s extras. If selling your house within this marketplace is not a choice but you need extra living space, you might find yourself pacing back and forth at the basement wondering in the event that you’re able to convert it to the room of your dreams. As the pictures below show, it is possible — and the choices are endless.

Diagrams: The steps in completing a basement

dSPACE Studio Ltd, AIA

If you think of finished basements, you likely think about a room that is not finished to the criteria of the bedrooms upstairs. This doesn’t need to be the case. However, the challenge of creating an inviting and beautiful area is greater in the basement, where the systems and infrastructure of your residence need to be hidden tastefully.

A finished basement certainly adds value to your home, but make sure you check with your own insurance agent. Some finished bathrooms might not be insured — and do not expect a bedroom to count in the total of bedrooms once you sell the house.

M.J. Whelan Construction

Plumbing. If you want to bring a toilet in the basement, then find your soil pile and see whether the main drain for your house goes underground or runs aboveground. If it runs underground, as long as you put the new toilet close to it, plumbing shouldn’t be a great deal more difficult than upstairs.

If it runs aboveground, you’ll almost certainly require a grinder and a pump — such as those produced by Saniflo. Water runs through gravity, so in the event that you want it to return once you flush, it requires special equipment.

Orfield Remodeling, Inc

Natural light. Natural lighting is often in short supply in a basement. In this image, the kitchen was set from the only window to maximize sunlight in the preparation area.

Additionally, many building codes require a second way to exit the basement in the event the space is going to be finished. Get more light and satisfy code requirements by installing an egress window and window nicely. An egress window is large enough for a person to exit through it, and also the nicely allows more light in your basement. To avoid water problems, have a drain installed in the base of the well.

Ernesto Santalla PLLC

The ceiling. You’d never know that this room is in a basement. There are always plumbing, wires and ducts to conceal. This usually means dropping the ceiling height in certain areas.

Attempt to combine the obstructions to one area and make a space with a lower ceiling. Continue the dropped ceiling to the walls for a natural transition. Boxing in pipes and ducts with soffits and chases informs people that there is something hidden.

Obviously, the other thing that makes this basement look like it belongs upstairs is the usage of drywall. You’ll need to place access panels where shutoffs, junction boxes or yards are. Be certain to install the drywall 1/2 inch off the ground and utilize moisture-resistant drywall. All basements flood eventually, and this can help.

Fiberglass-faced drywall is even better compared to paper-faced drywall, because it is the paper that harbors mould. Be prepared to pay additional for completing the fiberglass drywall, since the whole face should be skim coated with joint compound.

2Modern

Mio Ceiling Tiles – $98

Finished bathrooms traditionally had ceiling tiles in a grid as opposed to a drywall ceiling. Most individuals don’t like this look, so we’re seeing an increasing number of drywall ceilings. If you want simple access to the area above the basement ceiling but need a more interesting appearance, consider sculptural ceiling tiles out of Mio.

Because a basement is below the bathrooms, kitchen and other sources of water at the house, when a basement floods it often comes through the ceiling. In case you’ve got a drywall ceiling, then you will want to cut out a section and fix it. In case you have ceiling tiles it might be as simple as replacing a tile or two.

Read more about Mio’s tiles

Overall Basement Finishing

Height. Think about how you intend on using your finished basement. If you want to exercise down there, then you might want more headroom. Lift your arms overhead. I need an 8-foot ceiling to do that. Are you going to be standing on a treadmill? Insert the height off the floor to your own height. If you’re going to run on the treadmill instead of posing for fake exercise Facebook photos, you’ll need more room as you’ll bounce up as you run. Often the height just is not there.

Recently, my company solved this issue two different ways for two different clients. In one house we cut the flooring joists in that region and hung them out of structural headers. Then we included steel angles to encourage the floor. Ideally this region should be found under an area upstairs that does not get a lot of traffic, like under a coffee table.

In the other basement we couldn’t track down the space out of the path of visitors, so it made more sense to return. We dug a pit in the ground 12 inches, poured a new slab in the reduced level and poured little walls with a curb surround so the hole would not fill with water in the event the basement got moist. Lowered into the pit, the treadmill is flush with the surrounding floor.

Case Design/Remodeling, Inc..

Waterproofing. I know I return to flood, but it is going to occur, so plan ahead. If you do not have a system in place to deal with the water, then choose a flooring material that may manage getting wet, like the tile shown in this basement. If you do not have a floor drain, get one installed. It’s ideal to get a drain that ties into the storm drain right or that drains into a pit with a sump pump in it. Should you pay for all these systems up front, you will not be paying to replace rugs, furniture and appliances afterwards.

Pine Street Carpenters & Your Kitchen Studio

Lighting. The most crucial element to making a basement a place people need to hang out is very good lighting. Here is another instance of a well-planned ceiling design. The tray ceiling in the middle is surrounded by reduced areas that can conceal ductwork and piping. Additionally, it gave the builder a spot to install indirect lighting. Since the ceilings in a basement are generally lower than everywhere in the house, light reflected up off the ceiling — such as the ambient lighting inside this tray ceiling or the sconces on the walls — is far better than light directed down.

Revealing Assets – Home Staging Services

If you plan on using recessed lighting in your low ceilings, consider about the cone of light that spreads out of a recessed lighting. The closer it is to the floor, the closer you’ll need to space the lights to find good coverage. Fantastic lighting design makes a big difference, so hire a professional lighting designer. A variety of light types is important so the space can accommodate unique uses and moods.

There are many alternatives today for energy-efficient lighting, and therefore don’t avoid LEDs and CFLs because you think that they’ll throw an unflattering light. Everything from cool to warm light is offered in most types.

More:
Diagrams: The Measures in Finishing a Basement
Space for Family: Converting the Attic or Basement
5 Basement Renovations Created for Fun
How to Take Care of a Flooded Basement

See related

Pilaster

A pilaster is the official term for a flattened column projecting from a wall around a door or window or for a classical decoration on furniture. A easy pilaster will include a base, main column plus a capital (the ribbon at the top of the column) and can be either plain or ornate. Topping these bits, you will frequently find an architrave, frieze, and cornice.There may be extra ornamentation too, in the form of corbels (plaster, wood or iron trim bits that project out of the supporting piece), wood carvings or scrollwork.

david phillips

Pilasters frequently include an architrave, the expression for the piece that sits just over the capital. In this entertainment center, the architrave is the base of the bookshelf over the TV cupboard.

Harrison Design

The component formed by combining the architrave, the undecorated frieze over it, and the cornice, or top piece, into one unit is called an entablature.

david phillips

These fluted pilastercolumns are adorned with corbels in the very top whilst wainscotting covers the base. The space over the corbel is known as an arcade.

ASID, Christopher A Rose AIA

Above the pilasters of this bathroom are a capital and an arched walls opening. The centerpiece is known as the pendant.

American Masonry Supply, Inc..

All these pilasters are all topped by a capital.

Crisp Architects

When two pilasters connect on a corner, it is referred to as a canton.

Browse more pilaster photos

See related